19/04/24


We've compiled a video showing the avalanche of features developed since the last article. The list is vast and we've decided to present it in a video form.
This year was exhausting and exhilarating, with our design ideas coming to fruition. With most of the major tasks behind us, we are now entering a phase of refinement and optimization. And just like preparations and cleaning that precede the celebration of Christmas, we are dedicating our efforts to fine-tuning our project.
I want to express my gratitude for our team's hard work and dedication throughout this journey. Together, we've accomplished a great deal, and I look forward to presenting our refined and polished project in the near future.
We wish you a joyful and festive holiday season!
Fonline2 Developer Team
Hello wastelanders, We're eager to test the current in-house version of Season 4 before writing an article about it. We invite factions to participate in testing core features of the upcoming season:
If you're part of a faction and are interested in participating with your crew, react to this message for a tester role and quick briefing, as we intend to run the tests over the upcoming weekend. Small groups and solo players are also welcome to create factions to experience the game mechanics.
The test server will be running for at least 24 hours, and the town control will automatically begin in Redding every full hour. Redding was conveniently placed in an absurd spot near Junktown. You have whole freedom to explore world, do quests, dungeons and design bases. But our main goal is to test new build system and the town control mechanics. At the end of the test we will provide statistics and inform factions of their total score gained.
Edit: The test was a success and now we are gathering bug reports and improving on the game. Thank you everyone who has participated!
And the other things...
We've been hard at work and redesigning the core of character builds. This has led to a significant rewrite, merge of perks, and implementation of S.P.E.C.I.A.L.
Below we will talk about changes to the character system, and mention our build manager that lets you conveniently change and share builds and features of unsafe towns.
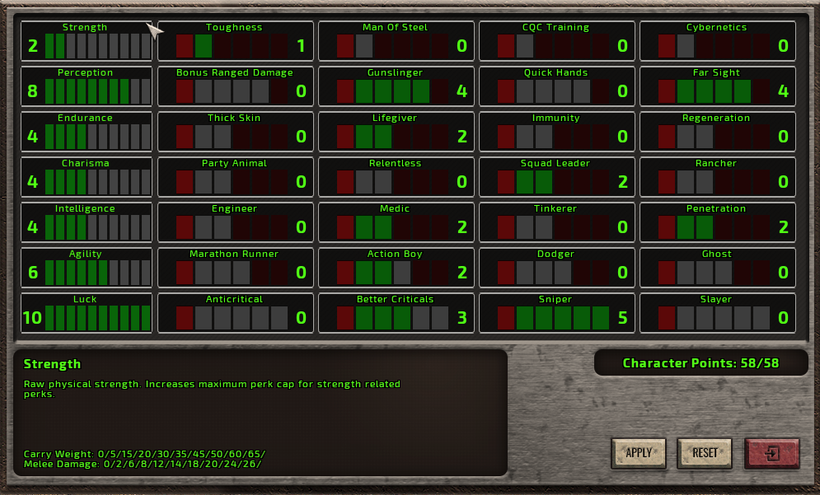
We’ve spent a long while redesigning the character system to allow more impactful, varied builds. With our new design, we’ve found a place for S.P.E.C.I.A.L., it is now is implemented into the game and provides small stat benefits, like a carry-weight bonus from strength for example.
But the most important task of S.P.E.C.I.A.L. is that it dictates the max perk level of its child perks.
Every S.P.E.C.I.A.L. has 4 perks assigned to it and the S.P.E.C.I.A.L. value divided by two is the max perk level you can pick.
For example: To pick level 5 Lifegiver player has to invest 10 points into endurance.
Marathon runner 5 requires 10 agility so to just have those two maxed perks, the player would already spend 30 out of 58 points. This encourages us to approach character building from a different perspective, trying to reach level 5 of perk is not anymore the main way to go.
The player begins with all S.P.E.C.I.A.L. being at level 1. The initial level of S.P.E.C.I.A.L. costs no points.
Because of S.P.E.C.I.A.L. implementation, we’ve adjusted and changed how perk points work. Now instead of 15 perk points, the player has 58 total character points, with 2 gained per level up until level 30. The now-named Character points are used to increase both your S.P.E.C.I.A.L. and the level of your perks.
To make all the perks more impactful. Some of the perks were merged, we’ve additionally added new perks to the list. New and modified perks can be found below.
Perks in bold font are not fully implemented yet. Features related to them are still a work in progress.
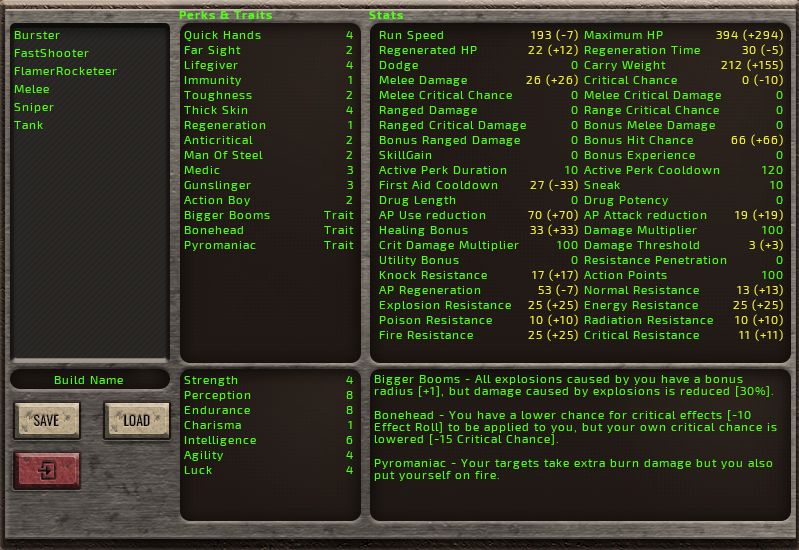
Build manager allows the player to simply load & save build presets, build presets are files that players can share. You only need to have enough points for the preset.
This is a huge Quality of Life feature, as instead of meticulously selecting S.P.E.C.I.A.L. and perk values and traits from someone, you can download a file from him, and without even restarting the client you can load the build into the manager and apply it to your character.
Browser-based build manager is also in progress and it will allow you to load/save build presets just like the in-game version.
The old Town Control type is changed into Town Raid, where players can raid the town treasury after finishing the raid.
New Town Control is focused on winning by score by taking control of individual randomly picked control points all over town. There will be two sides in each town conflict. Town control fights are between these two NPC factions. For players to participate in town control for either side, the faction leader/officer needs to choose the side that the faction will support for taking control of the town. Factionless players and factions that didn’t pick a side can join the fight as individual 3rd parties, but they cannot take over control points and won´t be able to gain rewards related to loyalty to one of the sides.
Below we will try to simplify how town control mechanics work.
Every 10 seconds a Tick happens.
During the tick, players within control points will shift the influence over the point to their team. Every player increases influence by one, and the max influence over a point team can have is 6.
Based on influence, the score is distributed, for example:
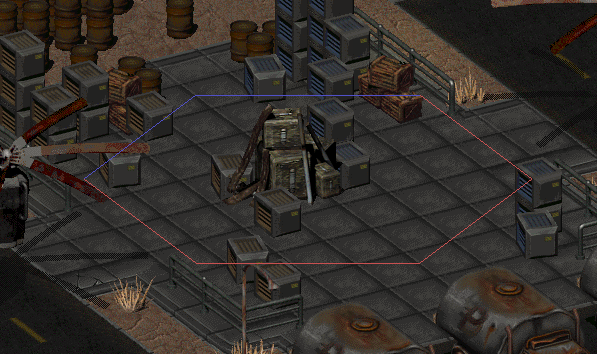
The blue team gains 2 points per tick and the Red team gains 4 points.
Killing enemy team members and NPC will award some score but it will not be as influential as the control point score.
Players will get individual rewards based on their participation score on top of faction rewards.
If there was a significant difference in team balance, the underdog will receive a reward multiplier.
Factions get allegiance reward that provides permanent bonuses to their factions if they remain loyal to one of the town teams.
The winning team takes over the city, other than the visual difference, the factions that sided with them will have benefits in town.
Raid is similar to our classic town control system but is turned into a quick skirmish instead of rewards for 24 hours.
Raid and treasury is completely unrelated to Town Control Event.
The town’s treasury will keep generating stackable loot every specific amount of time. Players can decide to try to raid the town which alerts the guards and announces it to the server. The town Raid triggers when at least half of the town guards are dead.
At the end of the raid if the town didn’t manage to defend itself for a set amount of minutes, the treasury will open and whatever rewards were there, can be looted by anyone, even by some unrelated sneaking thief. The treasury will remain unlocked until more loot gets generated.
The town can be raided as soon as there is generated loot and the treasury is locked.
In a case of guards recovering to full power because of players being unable to beat them, or resigned from assault, the raid fails and the treasury will not open.
To ensure the player is accurately rewarded for his effort and can secure his rewards from PvE and PvP activities, as well as some matchmaking events and achievements - They are not directly sent to his inventory, but instead to player rewards storage, while being in a safe location, the player can request and receive all of the rewards he has collected. This helps us to ensure that the player doesn’t lose his reward at the end of the event and allows us to implement challenges that completing wouldn’t bloat the player's inventory before he gets out of the unsafe location, it will also allow sending basic items to offline players.
Since our last Open Testing, we’ve improved some smaller things that players mentioned to us. There were hundreds of fixes and AI tweaks as we strive for as polished as possible experience, those smaller changes you will find out yourself. Below we will find the most often discussed QoL features.
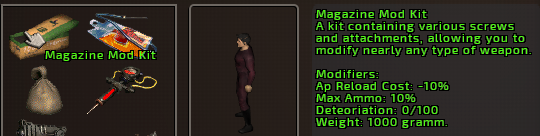
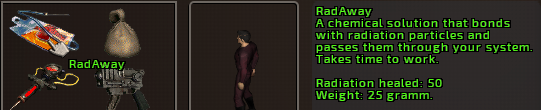
Item descriptions were updated, and players will now find all the information on what items do if it’s a drug or a mod.
This concludes our news. We will hope you like the improvements and we will keep on polishing the game until satisfied. We will see each other on open world PVP beta with the faction system implemented!
Hey Wastelander,
here you will find the link and mirror to download the client for today tests.
The game client will be released before tests.
Hey, Wastelanders.
We are going to organize a small beta test to pinpoint any bugs and find the issues with balance, beta test will offer both PvP and PvE elements,
Players will begin the game at the tutorial and then receive the following on completion:
Players will find three dungeons, Necropolis, Warehouse, and Glow.
- Necropolis is a PvE-only dungeon during this Beta test. So don't be shy about grouping up with strangers to get past the dungeon.
- Glow is slightly complicated and requires players to think smart to not get locked in and die from radiation. Radiation resistance drugs will allow Players to stay there for longer.
- Warehouse is full of deadly Deathclaws, it's a quick get-in, get-out type of place.
Players can create their outpost inside an encounter by crafting Tent Backpack and using it. Most of the base features are disabled but Players can use it as a storage and crafting place. Players can also invite others with the “#addmember playername” command.
There will be two towns available that players can regroup and trade-in.
The world map is separated by biomes. The encounters are randomly generated with structures and resources that are available for the specific biome player is in. Players might encounter two separate NPC groups at once that scale with their travel group count. Having 3 players in the travel group doesn’t exactly triple the enemy count. Each specific groups have its scaling so it’s balanced depending on enemy type.
Players can have up to 8 party members totally in Party, this means if one party member leaves, everyone else can follow them onto Worldmap. There is no limit or disadvantage to traveling in a group, as long as people travel on foot or the vehicle has enough seats for everyone.
If a group enters an encounter, everyone from your party will be able to see it.
For example, if you will enter an encounter, a party member in the hub can leave the town and join you as it’s visible to him on Worldmap.
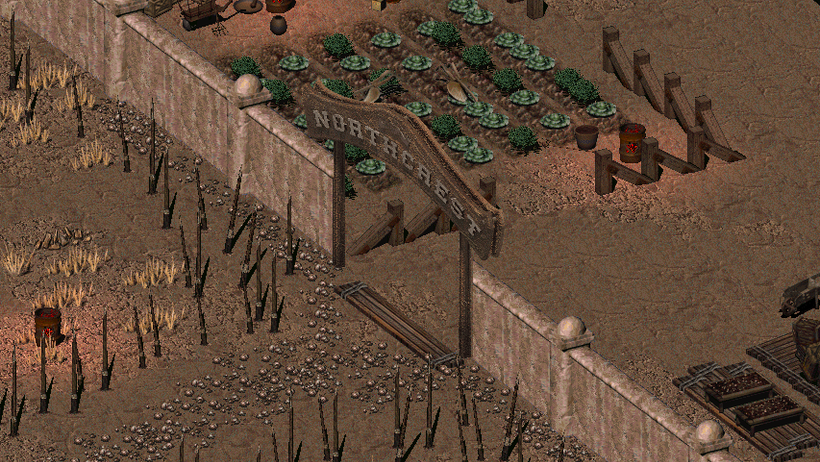
After registering, the game puts you in Northcrest Ranch, a semi instanced location with plenty of quests that teach basics to the player. The tutorial follows a couple of rules:
Players can follow the quest line to find out what to do or leave the location early by heading to a camp that is located northeast of the ranch.
When you die after the tutorial your loot will be dropped and you will respawn within an encounter somewhere 3 zones away from where you have been killed.
The player can find all his ongoing quests inside the quest log accessible by pressing “j” or opening it from the inventory/multipanel menu
Players might run into destroyable structures, it can be a rock pile, cracked wall, or just doors.
Destroying them could open passage to extra loot in dungeons, or secret shortcuts. One example can be found in Vault 15, where destroying rockfall with dynamite lets players into an extra loot room.
Suffocation is an anticamp feature, if players remain in a closed loot room that requires a certain task to be opened, they will begin suffocating. Suffocation takes a % of max health, so the result is a quick death if the player attempts to exploit secure rooms.
The outdoorsman skill is not yet active although it will work in a way that the highest party member outdoorsman skill will be used for traveling calculation.
You will now find an in-game bug report system after accessing the menu, there you can describe the issue. Your location and name will be automatically reported, so just include the information.
Since the last pvp beta, we’ve spent months optimizing and looking for things that might cause performance impact. The result is a far smoother game even if there are a lot of players running in combat.
I'm excited to share some news with you. We've been hard at work since the PVP beta testing and have made some amazing progress in implementing features for PvE and the core gameplay loop. Our team has been super productive and we've been making great strides in checking items off our to-do list. While a lot of the work has been on the code backbone, we're thrilled to give you a sneak peek of how some of these new systems will work.
We've got so much to share that we've decided to split it into two articles. In this first article, we'll cover the basics of player skills and the essential economic systems.
The gameplay elements presented below were created from scratch and are explained in a way to introduce them easily to new players. Stay tuned for the second article, where we'll dive into some major gameplay content. Thanks for your support!
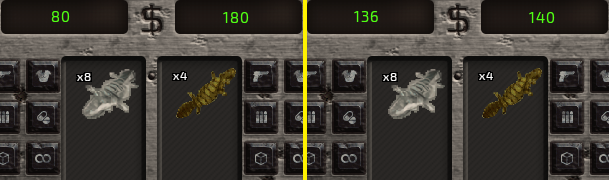
Barter is a skill that allows players to trade for goods at better prices. The higher the Barter skill, the better prices a player can get both when purchasing and selling goods. Barter is a progressive skill, meaning that as a player's Barter skill level increases, they will be able to access even better prices.
To level up Barter, players must trade for items. Specifically, purchasing items from traders will improve a player's Bartering skill, while buying bottle caps will not increase it. This encourages players to engage in trading and acquire a diverse array of items, rather than simply accumulating large amounts of currency.
With this redesign, Barter has the potential to become one of the most important skills and features of the game. By investing time and resources into improving their Bartering skill, players can gain access to better prices and a wider range of goods.
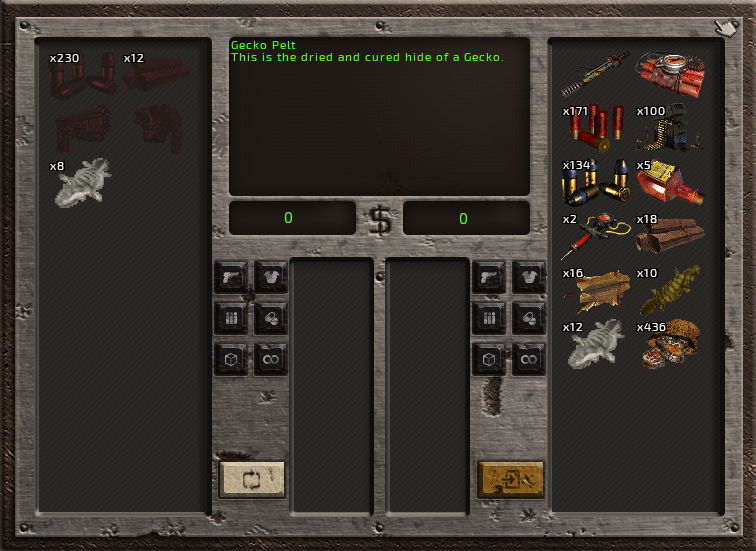
Some traders specialize in specific types of goods and offer better prices for those items compared to general stores. For example, a skin trader may accept Brahmin and gecko skins and offer a better price for them than a general store. In addition, the trader may allow players to barter for specific items in return, such as ammo and other resources, at a fair price.
To make it clear which items a trader accepts, the items that the trader does not accept are faded and colored red. This allows players to quickly identify which items can be put on offer to that particular trader.
Traders also have different skill levels depending on their location and the goods they offer. For example, a bar in Klamath may offer better prices for alcohol than a bar in Hub, while a gunsmith in Hub may sell guns and ammo more cheaply than a general store in the same town. This incentivizes players to explore different areas and interact with different traders to get the best prices for their items.
To prevent infinite resource trading, no item will be able to be bought infinitely by caps through the dialog window. Instead, a fair amount of balance will be required to accommodate supply and demand. This encourages players to manage their resources carefully and to prioritize certain items for trading over others. Overall, the trading system adds depth and complexity to the game, requiring players to think strategically about how they acquire and use their resources.
All item prices have been based on item real value, with resources priced at a low point and all weapons, armor, drugs, and other craftable items priced according to the cost of their base resources. This has significantly lowered the overall prices of items, with some items now costing as much as ten times less than they did before.
As a result of these changes, the value of a single bottle cap has significantly increased. This means that although players will earn fewer caps from activities compared to the previous version of the game, they will be able to purchase significantly more items for the same amount of caps. For example, instead of being able to afford only one combat armor with a certain number of caps, players can now purchase up to four combat armor for the same amount of caps.
Resources are divided into 4 Tiers, with each Tier containing a specific range of resources. This allows for a more organized and streamlined resource system, making it easier for players to identify and manage their resources.
The crafting system has also been debloated, making it simpler and more intuitive for players. The overall amount of resources has been adjusted to balance the game and ensure that players have access to the resources they need to progress without overwhelming a player with too many options.
Most crafting recipes require one of 4 types of workbenches: General, Ammo, Chemistry, and Gunsmith. Crafting basic items does not require any workbenches.
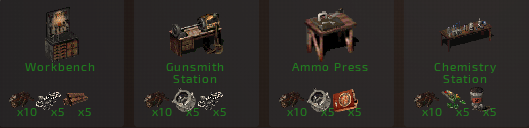
The player needs to be near the workbench to be able to use it. The distance is more than 5 hexes, so good workbench placement means the player can use all workbenches from a single position.
Workbenches can be found in towns, or be built in player bases.
More advanced crafting recipes require a specific profession level. The number of profession levels can vary between 4-6 depending on the profession type. Profession levels can be gained mainly by completing specialization quests or being taught by NPCs.
Repair is a skill that allows players to restore the condition of their items. The mechanic works by requiring players to spend a resource material to repair an item that has been damaged or degraded through use, low tier items are exceptions to this rule. The material required for repair varies depending on the item being repaired.
Items are divided into tiers, with higher-tier items being more complex and difficult to repair than lower-tier items. This means that repairing higher-tier items requires a higher skill level than repairing lower-tier items.
When attempting a repair, players have a chance of success, which can be increased through the use of specialized tools. If a repair fails, the item being repaired will suffer additional damage, and may even break completely, rendering it unusable.

Broken items can still be repaired, but the cost of repair is doubled. It's important to note that item deterioration does not decrease the performance of an item. However, if an item becomes completely broken, it provides no benefits and must be repaired before it can be used again. In such a scenario, sometimes it is just better to dismantle an item.
Successful repair increases skill progression.
All craftable equipment can be dismantled, providing players with a chance to obtain resources used for their crafting. When an item is dismantled, it has a chance to yield up to half of each resource amount used in its creation. However, the chances of obtaining these resources decrease with each additional ingredient, and the third ingredient, which is often a rare resource, has a low chance of being returned.
Players can improve their chances of obtaining resources from dismantling items by using tools.
Dismantling chance is not affected by any skill.
It's worth noting that completely broken items have the same chances of yielding as many resources as brand-new items, so players are encouraged to dismantle broken items rather than simply discard them.
Traps are a significant hazard in the game, and players must be careful to avoid them or risk taking damage. Traps can be part of a lock or as a hazard on the maps, and players can also use traps like mines or dynamite for leverage in combat. Explosives can open secret pathways or extra loot rooms in the dungeons, providing players with additional rewards for mastering the use of explosives.
There are several types of traps in the game, each with its own unique challenges and dangers. Players can use a variety of explosives, including mines, C4, and dynamite. Each explosive has a different use, allowing players to experiment with different strategies to gain an advantage in battles or to uncover hidden areas.
Disarming traps increases the player's skill progress, but the trap itself gets destroyed completely.
Players will encounter two lock types: electronic and mechanical. Both lock types can be lockpicked, but electronic locks require an electronic lockpick to attempt lockpicking, while mechanical locks can be picked by hand.
To aid in lockpicking, the player can use lockpick sets, which come in two types for each lock type. For electronic locks, the player can use an electronic lockpick or its mk2 version. For mechanical locks, the player can use a lockpick set or an expanded lockpick set.
Using lockpick sets significantly increases the player's chance of successfully opening a lock. However, even with the right tools, lockpicking can be difficult with a low skill level.
Each lockpicked door/container increases skill progress.
Cooldown is applied on failure, which means that players can attempt to repair, lockpick, or disarm traps as many times as they want as long as they succeed. However, if they fail, there will be a cooldown period before they can attempt it again. This cooldown period can be affected by the Tinkerer perk, which can reduce the amount of time players have to wait before they can try again.
we hope this gives you a taste of what's to come, and we can't wait to share more about the other features we've implemented. Stay tuned for our upcoming updates, and thanks for your continued support!
[ The test has finished, Season 4 is not yet available. ]
- Tests are scheduled for:
December 22, 7PM - 10 PM GMT+1
December 23, 7PM - 10 PM GMT+1
The time might be extended if neccessary.
- Players will be in instanced locations. Every starting location can host up to a specific amount of people.
- You can join any arena or spawn instance by using commands and typing id
- For interested groups with player amount bigger than 12 we can host private arenas that require access code to enter. For such request please contact me on discord.
- We're hosting S4 on same host server as S3, if you're IP banned, you're IP banned, we're not lifting it.
- It's still an early beta test, we did our best to polish it and implement QoL features, yet do not expect for everything to be perfect.
- You will find all neccessary info in game after pressing F1 key.
- You can't change the cosmetic look you will begin the game with.
- There is no saving during testing. We wipe the game every game restart, so it means you will need to register again after a restart.
- Registration puts you in the game instantly, build is done after registration phase.
- We will provide google forms for feedback and bug reporting.
It has been a short while since the last post, but during this time PVP arena has been created and quite an amount of balancing has been done on character perks & traits, and weapons. Most crucial balancing is somewhat done and base mechanics were tested. We’ve established an initial balance point but a lot more testing will certainly be needed. Open PVP arena will provide us with data to make adjustments along the way. Now is up to players to invent all kinds of crazy builds and combinations and see how they play out in arena PVP matches.
Players that join test sessions will find themselves at level 30 with all increased skills.
Upon Registering you will find yourself in a starting location with the rest of the players, here you can set up your perk and traits and grab gear from replenishable containers nearby. There are NPC targets around the place for you to test out your builds. The graveyard might be locked, depending on player flow.
After the set-up phase, the arena will be unlocked, and entering it will assign you to the first available unfilled Arena. You can readjust your builds during a match and will find more loot in containers on spawn if you need to swap.
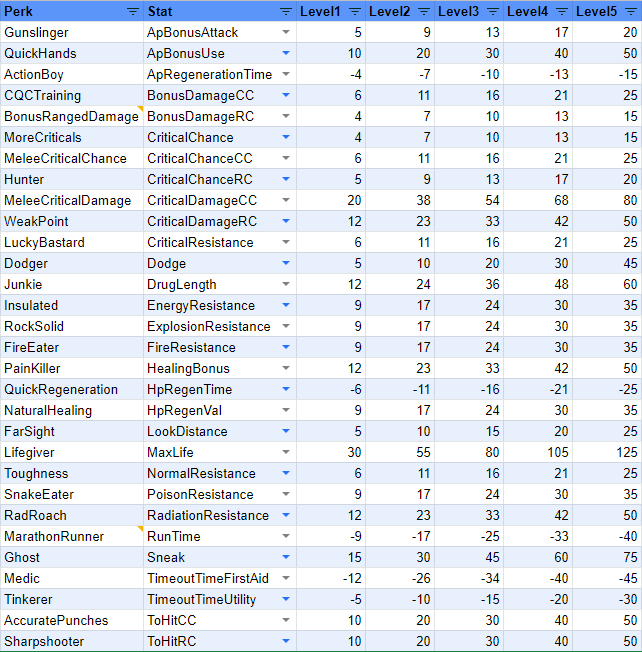
Perks values were changed in a way that some of the first levels give more benefits than the following levels, which aims to increase the build diversity.
Below you will find a list of perks with stats.
Ready players are able to join the arena with their own gear and be placed in 10vs10 matches.
The matches by default are Team Deathmatch with the first team to score 50 becoming a winner.
Over the span of matches, different game modes can launch.
Game modes:
You will be able to change your build anytime during combat by either typing commands or accessing characters by pressing C.
You will see your team members all the time.
With each death your gear will repair itself and ammo will replenish for equipped weapons, drugs will also spawn. Depending on the game mode, you will respawn during or after the match.
We’ve decided to stray from the classic mouse controls, The control scheme is:
Right Click to move
Left click to interact/shoot
Pressing A on the keyboard toggles between attack and default cursor
Alt + right click resets the cursor back to default.
Right-clicking closed doors in attack mouse mode will open the door.
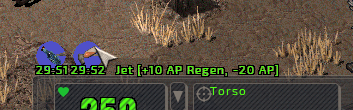
All cooldowns are displayed as circles above the combat ui, cooldowns on the mouse over display time remaining for drugs. Cooldowns also display debuffs caused on you like bleeding and poison and show the level of the debuff.
The hotkey system is a flexible tool to customize the client to your liking, you can slot drugs, ammo, weapons, armor, and skills in there to use it with keyboard hotkey or left click, By default consumables and skills are used on self but holding ALT enables USE ON mode, letting you pick the person you want to, for example, heal. The hotkeys are also expandable so you can customize the amount you need.
Weapon attack costs are balanced depending on weapon type. Most weapons follow the universal rules listed below, but there are always a few exceptions.
Attack Cost:
Reload Cost:
Aiming for eyes adds 10 AP extra cost, and 5 AP for the groin, legs, arms, and head.
There are a few ways to reduce the AP cost of shooting:
Fast Shoot trait 10% reduction
Gunslinger perk up to 20% reduction
With a total of 30% AP reduction to shoot excluding weapon modding. This means that by default you can burst once with BG weapon and have 40AP remaining, but with enough AP reduction, a double burst becomes possible. This also means that a small gun can burst 3 times in total.
Max AP reduction unaimed attacks mean you can shoot 4 times on pistols. This trait and perks do also work on melee and throwing weapons, so it means you can get low as 18AP which means 5 unaimed attacks.
The weapons were designed in a way to provide certain weapon type benefits and be different in more ways than just damage stats. Below you will find an in-depth description of what was changed about your wasteland weaponry.
Shotguns
Shotguns are designed to be effective short-range weapons, shooting cones of 5 hexes wide shots. It has the option to burst and single shots.
Shotguns can be used for point-blank 1hex to cause massive dmg to single targets nearly, almost reaching the damage output of minigun weapons. All shotguns have a chance to knock back targets, so shotguns can be used to knock back multiple targets at close range. Shotguns cannot use aim shots, but unaimed single shots are a viable option for close encounters. Shotgun shots also pierce targets up to a certain amount. To sum up shotguns have a 5 hex wide line of fire, pierce targets, cause a knockback effect, and have a high dmg hex but limited range, which makes it one of the best short-range weapon types in the game.
Miniguns
Another 5 hex wide burst weapon type. Weapon range middle range makes it an ideal crowd control tool and flanking weapon against multiple enemies. It has the highest 1hex dmg of all weapons and decent range dmg. It is costly to reload.
Big Gun Burst Rifles
LSW and M60 weapons have better range compared to sg rifles of the same tier. They deal a bit more dmg than sg rifles but at a higher AP cost to shoot and reload.
Big Gun Aimed Shot Rifle
Only Bozar is currently in this category. It is the highest-range weapon in the game and also deals very high damage. The shots cause a knockback effect on targets and the shot can pierce through multiple targets.
Small Gun Rifles
These rifles are the most versatile weapons and can vary between burst and single shots depending on need. Burst is 3 hex wide, it can deal pretty good concentrated burst fire on few enemies in distance, and burst dmg on the range is higher than miniguns. On 1hex dmg is quite far behind compared to miniguns, but still quite effective. Rifles can do a variety of things but do not excel over others in any of those.
SMGs
Similar to small gun rifles but offer a much shorter range. Instead, they deal more damage. SMG weapons have a really good damage/AP cost ratio, which makes them a preferred close-quarters weapon. With just a few AP reduction perks it can do 3 bursts, It is a much more agile weapon on close-range fights than big guns, which shoot fewer times and require much more to reload.
Small Gun Sniper Rifles and Pistols
Pistols and Snipers are good for middle and long-range correspondingly. Players could focus on the number of shots or set up for the critical build. Those weapons have lower AP costs than big guns, which makes these much more effective in terms of damage per used AP. Although damage-heavy, those weapons lack a burst option, so they become disadvantaged at close range. Sniper rifles have a higher range than pistols and a bit more dmg, but higher AP cost.
Laser Rifles and Pistols
The laser damage type performs best on low armor targets. Well-armored targets or enemies wearing tesla armor reduce the effectiveness drastically. One characteristic of laser weapons is that laser pierces targets in line and is able to hit multiple targets with the same shot. Lining up multiple targets perfectly might be hard to pull off but every hit target receives the same amount of damage. The downside of this feature is that friendly fire is harder to avoid and positioning becomes a key. Laser rifles have a higher range, AP cost, and dmg than laser pistols. Aim shots with lasers are also possible but the effect is applied only on the main target, the rest of the hits are counted as unaimed shots. Laser Rifles deal more dmg than a sniper rifle, but have a little bit less range.
Plasma Rifles and Pistols
Plasma weapon shots cause a small Area of Effect (plasma blobs) when the projectile hits the target hex. Since the projectile has speed, it means it also is dodgeable by movement. The Aim shot is possible on the main target and the rest of the hits are unaimed. Just like with other weapon types, Rifles have a higher range, ap cost, and damage than pistols. Plasma weapons are middle and short-range weapons. With plasma, one possible use is that you can anticipate spamming corners and chokepoints.
Pulse Rifles and Pistols
Weapons with electric Damage type cause a stun effect on the target. The stun effect disables running for a few seconds. This type of weapon can be aimed and is not using a line of fire, so it will only hit its main target. Metal armors provide no protection against pulse weapons, so if you see metal on the enemy, switch to pulse type if you have one.
Laser Bursting Weapons
Gatling laser, Phazer, and Solar Scorcher are Laser bursting weapons. 5 Hex wide burst and laser type damage provide that it pierces targets and is good vs low resistance players. Phazer and Solar Scorcher are lightweight 1 handed laser weapons with a smaller range and decent dmg. The Gatling Laser causes total destruction unless the target has enough resistance.
Flamers
Flamer deals initial fire-type damage to targets and causes burning debuff. Each fire-type attack stacks more burning debuff. Higher fire resistance helps against flamer damage and reduces burning debuff damage. A Flamer attack affects all targets in the line of fire. Flamers are ideal as close-range mass AoE weapons but are easy to deal with friendly fire.
Rocket Launcher
Rocket Launcher has a high range, high dmg shots. Rockets now have projectile flight time, allowing targets to run off the rocket course before it hits. Rocket Launchers reload cost of 50 means that these are more like shock weapons on the very first moments of clash. They aren't so good at dealing with constant dmg in a longer fight because need to reload after each shot. It is thought the best weapon for pulling targets or pushing targets away. There are also some new traits related to rocketeer gameplay that makes explosions more deadly and bigger AoE. Few ammo options AP rockets and Explosion rockets, for dealing more dmg or dealing bigger AoE.
Grenades
Grenades are more of a secondary weapon than the main one. Grenades now have projectile speed and delay on the ground before they explode. This makes them easily dodgeable. There is a Trait Demoman to remove the delay on the ground, but still, with this trait, projectile speed still gives some time to dodge the grenade. Frag grenade now has a chance to cause a knockback effect from the explosion. Plasma Grenades got a chance to cause a knockdown. Molotovs have no delay on the ground because they break right away when hit. Molotovs cause small initial fire dmg and burning debuff on targets.
Melee weapons overall
Melee weapon's effectiveness based on damage/Action Point cost is the highest of all weapon types and has various different effects (knockdown, knockback, bleeding, poison) based on weapons and attack types. Also, perk bonuses for melee weapons give more value in percentage than similar perks for ranged weapons. There are also critical effects as in aimed shot-range weapons.
Subtypes of melee weapons bring different results:
Critical and Critical effects are now calculated based on just critical chance stat.
The higher this stat, the higher Chance and Roll.
There is no separate critical roll stat anymore.
Default Critical Chance is 10%
If the Player aims there is a critical chance bonus added depending on a body part:
There are perks, traits, and a drug that increases this value further.
Bonus Damage and Critical Bonus Damage are separate values and one excludes another, so if your goal is to deal with crits, you should invest in the latter.
Default Critical Damage Multiplier is dependable on what body part was hit:
Critical Effects
Critical Effects are calculated once per attack and they are dependable on your critical chance, the higher critical chance the higher possible crit roll.
Possible effects depending on the aim target:
Non-critical aimed shots still grant some damage bonus:
Critical Resistance can be increased to avoid criticals being dealt to you and reduce the chance of crit roll effects happening.
Drugs are divided into 3 types: Soft, Hard Drugs, and Instant Drugs
Soft Drugs work for 30 minutes and Hard Drugs work for 3 minutes
Soft drugs give minor benefits and no negatives.
Hard drugs are more situational and build-specific drugs with maluses.
Using a soft&hard drug resets the drug timer instantly, There is no need to wait for the drug to stop working and no addiction drawbacks are implemented as of yet.
You can take 1 of each drug, so if you want you can take all in-game drugs at once.
Soft Drugs, which bring only positives for 30 minutes
Hard Drugs come with negatives and work for 3 minutes
There are various ways drugs can be used for your benefit. For example, mentats could be used for critical bursters and aim shooters. Buffout could be used by front-line tanks to soak critical hits. Jet can be used for everyone, which reduces initial impact by lowering AP, but in extended fights, AP gain overshadows the bigger ap pool. Psycho is for close-range melee/hexers/flamer/shotgun builds or when the place enforces purely close-quarters combat. A cookie is a very rare consumable that can be used by any build and comes with no other negative effects than its scarcity.
Healing Drugs:
Healing drugs trigger instantly and share a cooldown that is applied by some of the instant healing drugs.
There are also new healing mechanics for healing by shooting healing cartridges on targets (Needler pistol).
Healing bonus traits increase the effectiveness of all healing drugs, including Antidote and Rad-Away.
Skill books increase Skill Gain and Exp gain by 50% for 30 minutes.
Consumables cost 30 AP to be used.
The current option setting allows you to switch window resolution and Music&Sound volume. It is accessible by pressing ESC and choosing settings. It is still in development and ultimately it will allow you to configure the game, pick your preferred settings, and set up all keybinds.
Keybinds will be ultimately remappable through the settings menu that is currently in development. Currently though here are the keybinds
A - Toggle Attack mouse
H - Toggle Sneak
C - Open the Character screen
In character screen:
T - Traits Selection screen
P - Perk selection screen
I - Inventory screen
P - Crafting
M - Weapon Modding
U - Building
K - Friends
F5 Show Player Names
F6 Show overhead HP
F7 Overhead HP toggle between CURHP/MAXHP and CURHP
F8 Disable scrolling
R - Reload
Ctrl+G - Loot ground (Opens looting screen if there are more than 1 item)
Ctrl+D - Drop inventory to the ground
Alt+Q - Aim Eyes
Alt+W - Aim Head
Alt+E - Aim Reset
Alt+A - Aim Left Arm
Alt+S - Aim Groin
Alt+D - Aim Right Arm
Alt+Z - Aim Left Leg
Alt+C - Aim Right Leg
B- Swap weapon
N- Swap weapon mode (Single/Burst)
, and . - Rotate
Numbers 1,2,3,4,5,6,7,8,9,0 - Use the corresponding fast slot
ALT Numbers 1,2,3,4,5,6,7,8,9,0 - Alternative fast slot use e.g. alt+5 will let you use FA on someone.
Hello everyone, first off, thank you for the positive feedback we received during the last article and the Livestream, your doubts were compiled as Q & A and posted on discord. We’re now ready to talk about the initial character design.
We’re here to talk about Traits and Perks and Build System combat-wise. So this will be mentioned just after the basics.
From character creation, only race will have an impact on your initial stats, currently, there won’t be anything else that alters them.
The exact values for Perks and Traits are still being shaped, they will be available in-game during the PVP test phase. 100% of perks are implemented, and 90% of traits are implemented.
The player's soft cap is up to level 30, after level 30 no extra is gained from leveling up.
Players will gain a trait point every 10 levels, so at levels 10, 20, and 30, amounting to max 3 trait points.
Traits do not have multiple levels, you pick a trait, and gain a full effect.
There will be no traits at character creation.
Players will gain a perk point every 2 levels, ultimately ending with 15 perk points total.
Perks will have 5 Tiers/Levels each, which means you can invest 5 perk points into them.
The perk tiers are respectively unlocked at levels 0, 5, 10, 15, and 20.
Perk points are gained on 2,4,6,8,10,12,14,16,18,20,22,24,26,28,30 level.
While perks are mainly stat improvements, the traits change your approach by modifying combat mechanics in an interesting way, you’ll see what I mean with the list:
Below you’ll find a list of Traits and Perks, please remember, those are initial ideas and it all depends on the testing outcome to find out what is kept and what is being removed.
There are some interesting perks that players can choose from, with 3 traits on level 30 a player can make quite the explosive mix.
The perks do not exclude each other, which means even crazy combinations like Rad Child + Fast Metabolism can be applied. As a result of taking Fast Metabolism player has zero radiation resistance so he takes all radiation damage, which now heals him thanks to Rad Child.
Some other traits like Empathy, change how you approach the game, Empathy player with a healing weapon can be an amazing support in a full crew, but his own damage is quite lacking.
With a bigger amount of perks to pick from, and more perk points overall, we are able to create a lot more different combinations, and let players experiment on what does work, and what doesn’t. They can allocate all their points to specific perks or spread them around. It’s up to the player to decide, we’ll just attempt to balance it all out.
An interesting mix can be spotted, like taking a short-sighted trait and max level of far-sight perk will end up with default sight range as malus gets negated but as positive outcomes, you can now see through nearby walls in 3 hex range.
The build UI pulls the perk&trait statistics from the code responsible for setting those changes, so it will reflect numbers that modify player stats. No more outdated descriptions!
As mentioned before, the goal is for a player not to be forced to have multiple accounts, the build system will be flexible and can be tweaked combat-wise, and the rest, which is utility, achievements, and such will be separated from the combat build and provide beneficial bonuses.
As the rest, the race needs to be something that can be exchanged as they offer different gameplay perspectives. We will implement an in-game way to change your race.
By default a player will always have 100 action points, this amount can be increased by drugs or certain traits. Action points regenerate only when idle.
Every player will begin the game with 100 hp and gain 2hp per level and 3 carry weight.
The default sight is 35 hexes, which can be altered both positively and negatively by traits.
Everyone will begin their adventure with all skills undeveloped, first levels are very easy to increase, it gets tougher the higher the skill is though.
Every skill will have a corresponding skill book that will provide a skill gain multiplier for an amount of time.
Experience gained from kills won’t be the main source of XP income, doing quests and events will net you significantly more XP.
The Experience is rewarded party-wide, if your party member kills an enemy you see, you will gain an equal amount of exp as the killer.
There’s a simple cover mechanic, if the target stands behind an impassable hex or someone, the hit chance will be reduced.
There was a question about enemy hp information above head, this is implemented and you do not need any perk or a trait to see it.
You can toggle between
All non-combat traits are separated from combat builds and will be gained by completing achievements or bought out by mastery points. Masteries will be a way to reward players for continuing to gain experience and will be implemented after everything else build-wise is balanced and implemented.