


Season 4 Progress 1/2
Hey there!
I'm excited to share some news with you. We've been hard at work since the PVP beta testing and have made some amazing progress in implementing features for PvE and the core gameplay loop. Our team has been super productive and we've been making great strides in checking items off our to-do list. While a lot of the work has been on the code backbone, we're thrilled to give you a sneak peek of how some of these new systems will work.
We've got so much to share that we've decided to split it into two articles. In this first article, we'll cover the basics of player skills and the essential economic systems.
The gameplay elements presented below were created from scratch and are explained in a way to introduce them easily to new players. Stay tuned for the second article, where we'll dive into some major gameplay content. Thanks for your support!
Barter
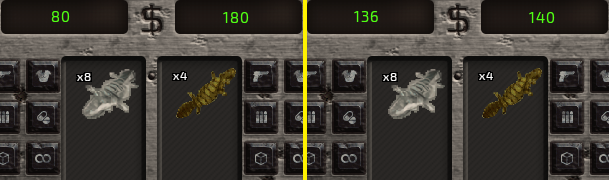
Barter is a skill that allows players to trade for goods at better prices. The higher the Barter skill, the better prices a player can get both when purchasing and selling goods. Barter is a progressive skill, meaning that as a player's Barter skill level increases, they will be able to access even better prices.
To level up Barter, players must trade for items. Specifically, purchasing items from traders will improve a player's Bartering skill, while buying bottle caps will not increase it. This encourages players to engage in trading and acquire a diverse array of items, rather than simply accumulating large amounts of currency.
With this redesign, Barter has the potential to become one of the most important skills and features of the game. By investing time and resources into improving their Bartering skill, players can gain access to better prices and a wider range of goods.
Traders
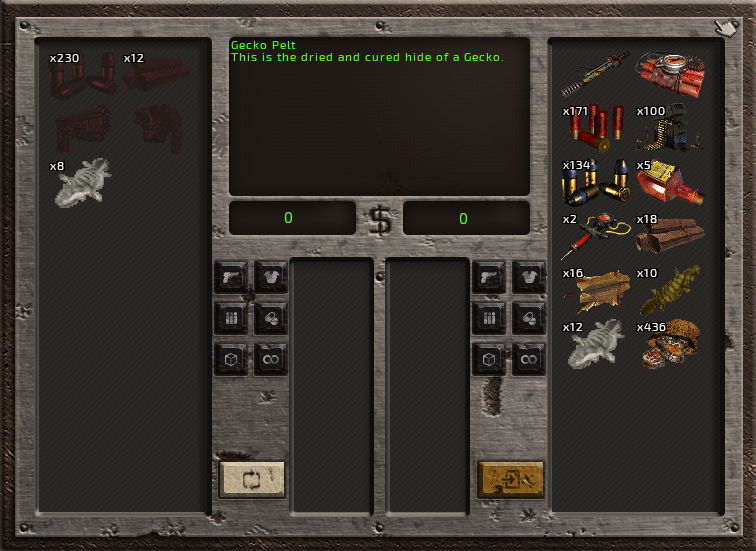
Some traders specialize in specific types of goods and offer better prices for those items compared to general stores. For example, a skin trader may accept Brahmin and gecko skins and offer a better price for them than a general store. In addition, the trader may allow players to barter for specific items in return, such as ammo and other resources, at a fair price.
To make it clear which items a trader accepts, the items that the trader does not accept are faded and colored red. This allows players to quickly identify which items can be put on offer to that particular trader.
Traders also have different skill levels depending on their location and the goods they offer. For example, a bar in Klamath may offer better prices for alcohol than a bar in Hub, while a gunsmith in Hub may sell guns and ammo more cheaply than a general store in the same town. This incentivizes players to explore different areas and interact with different traders to get the best prices for their items.
To prevent infinite resource trading, no item will be able to be bought infinitely by caps through the dialog window. Instead, a fair amount of balance will be required to accommodate supply and demand. This encourages players to manage their resources carefully and to prioritize certain items for trading over others. Overall, the trading system adds depth and complexity to the game, requiring players to think strategically about how they acquire and use their resources.
Item Pricing & Value of caps
All item prices have been based on item real value, with resources priced at a low point and all weapons, armor, drugs, and other craftable items priced according to the cost of their base resources. This has significantly lowered the overall prices of items, with some items now costing as much as ten times less than they did before.
As a result of these changes, the value of a single bottle cap has significantly increased. This means that although players will earn fewer caps from activities compared to the previous version of the game, they will be able to purchase significantly more items for the same amount of caps. For example, instead of being able to afford only one combat armor with a certain number of caps, players can now purchase up to four combat armor for the same amount of caps.
Crafting
Resources are divided into 4 Tiers, with each Tier containing a specific range of resources. This allows for a more organized and streamlined resource system, making it easier for players to identify and manage their resources.
The crafting system has also been debloated, making it simpler and more intuitive for players. The overall amount of resources has been adjusted to balance the game and ensure that players have access to the resources they need to progress without overwhelming a player with too many options.
- Tier 1 resources are your raw ingredients, gecko skins, iron ore, and junk.
- Tier 2 resources are mostly the outcome of processing raw ingredients, e.g. gecko skins and brahmin skins turn to leather, iron and junk turn to metal, Broc flowers and Xander roots turn into chemicals.
- Tier 3 are a group hard to gain resources used in more advanced crafting recipes, those are available in limited amounts from shopkeepers, rarely gained from dismantling, and lootable in dungeons.
- Tier 4 are the rarest materials, used in endgame weapon recipes.
Most crafting recipes require one of 4 types of workbenches: General, Ammo, Chemistry, and Gunsmith. Crafting basic items does not require any workbenches.
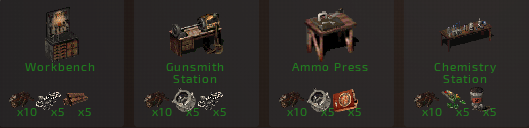
The player needs to be near the workbench to be able to use it. The distance is more than 5 hexes, so good workbench placement means the player can use all workbenches from a single position.
Workbenches can be found in towns, or be built in player bases.
More advanced crafting recipes require a specific profession level. The number of profession levels can vary between 4-6 depending on the profession type. Profession levels can be gained mainly by completing specialization quests or being taught by NPCs.
Repair
Repair is a skill that allows players to restore the condition of their items. The mechanic works by requiring players to spend a resource material to repair an item that has been damaged or degraded through use, low tier items are exceptions to this rule. The material required for repair varies depending on the item being repaired.
Items are divided into tiers, with higher-tier items being more complex and difficult to repair than lower-tier items. This means that repairing higher-tier items requires a higher skill level than repairing lower-tier items.
When attempting a repair, players have a chance of success, which can be increased through the use of specialized tools. If a repair fails, the item being repaired will suffer additional damage, and may even break completely, rendering it unusable.

Broken items can still be repaired, but the cost of repair is doubled. It's important to note that item deterioration does not decrease the performance of an item. However, if an item becomes completely broken, it provides no benefits and must be repaired before it can be used again. In such a scenario, sometimes it is just better to dismantle an item.
Successful repair increases skill progression.
Dismantling
All craftable equipment can be dismantled, providing players with a chance to obtain resources used for their crafting. When an item is dismantled, it has a chance to yield up to half of each resource amount used in its creation. However, the chances of obtaining these resources decrease with each additional ingredient, and the third ingredient, which is often a rare resource, has a low chance of being returned.
Players can improve their chances of obtaining resources from dismantling items by using tools.
Dismantling chance is not affected by any skill.
It's worth noting that completely broken items have the same chances of yielding as many resources as brand-new items, so players are encouraged to dismantle broken items rather than simply discard them.
Traps
Traps are a significant hazard in the game, and players must be careful to avoid them or risk taking damage. Traps can be part of a lock or as a hazard on the maps, and players can also use traps like mines or dynamite for leverage in combat. Explosives can open secret pathways or extra loot rooms in the dungeons, providing players with additional rewards for mastering the use of explosives.
There are several types of traps in the game, each with its own unique challenges and dangers. Players can use a variety of explosives, including mines, C4, and dynamite. Each explosive has a different use, allowing players to experiment with different strategies to gain an advantage in battles or to uncover hidden areas.
Disarming traps increases the player's skill progress, but the trap itself gets destroyed completely.
Lockpick
Players will encounter two lock types: electronic and mechanical. Both lock types can be lockpicked, but electronic locks require an electronic lockpick to attempt lockpicking, while mechanical locks can be picked by hand.
To aid in lockpicking, the player can use lockpick sets, which come in two types for each lock type. For electronic locks, the player can use an electronic lockpick or its mk2 version. For mechanical locks, the player can use a lockpick set or an expanded lockpick set.
Using lockpick sets significantly increases the player's chance of successfully opening a lock. However, even with the right tools, lockpicking can be difficult with a low skill level.
Each lockpicked door/container increases skill progress.
Skill Timeouts
Cooldown is applied on failure, which means that players can attempt to repair, lockpick, or disarm traps as many times as they want as long as they succeed. However, if they fail, there will be a cooldown period before they can attempt it again. This cooldown period can be affected by the Tinkerer perk, which can reduce the amount of time players have to wait before they can try again.
Thank you for reading,
we hope this gives you a taste of what's to come, and we can't wait to share more about the other features we've implemented. Stay tuned for our upcoming updates, and thanks for your continued support!